ARKit + SceneKit: Place content in the real world
Learn how to place content in the real world. We use a combination of ARKit and SceneKit and a lot of fun in this tutorial.
Apple’s ARKit framework allows us to create wonderful AR experiences on Apple devices. When it comes to creating content there are multiple options and in this post we want to take a look at SceneKit. One of the most basic use-cases in AR is to place content. If we want to react to user input and put something where our user is touching the screen, we have a little challenge.
While it is rather straight-forward to receive the position of the touch on the screen it becomes a lot more challenging to find the place in the real world.
If we want to use SceneKit however this is not as complicated as we might think and we only need a few lines of code to do it. Let’s look at those.
Disclaimer: This is currently only working with UIKit. If we want to use SwiftUI (❤️) we “need” to use RealityKit (which actually makes it even easier to do this). Hit me up on Twitter if you’re also interested in a tutorial for that.
Create a new Xcode project
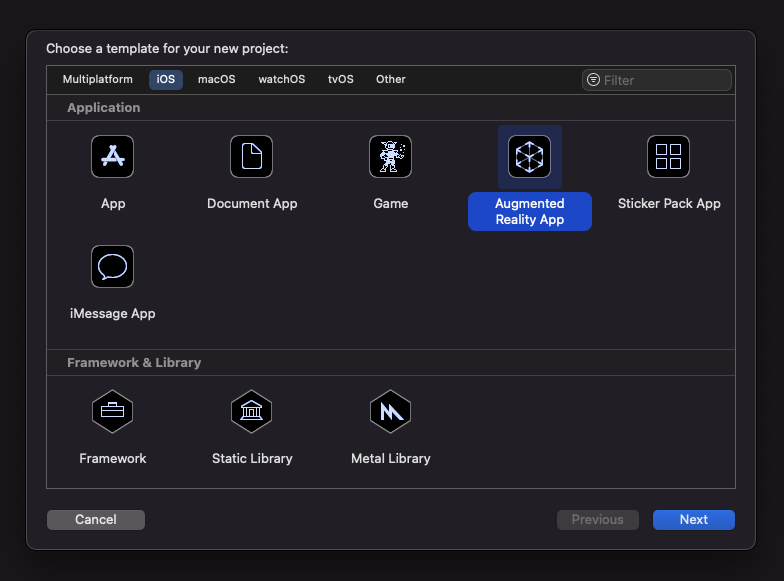
We start off by creating a new Xcode project and selecting the Augmented Reality App template as shown below:
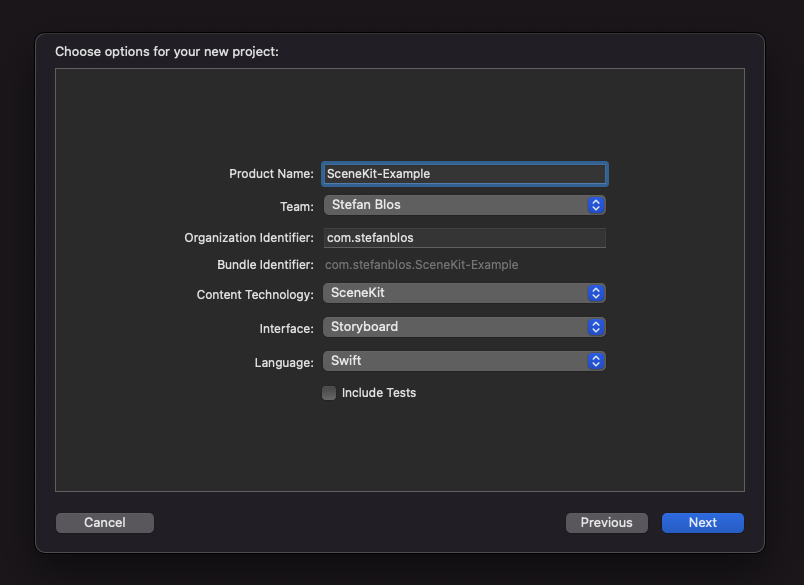
Next, we enter a name and for the Content Technology we choose SceneKit. We have to use Storyboard as an Interface and Swift as a Language so we just leave that as is and save our project somewhere on our machine.
Remove unused files from generated Xcode template
Xcode is generating an entire sample for getting to see the capabilities of ARKit. We don’t need this for our example so let’s clean that up.
First thing to delete is the art.scnassets folder. The model that is inside of it will not be used during this tutorial so we can savely delete it.
Next, we take a look inside of the ViewController.swift file. Here, we need to keep the following things:
@IBOutlet var sceneView: ARSCNView!viewDidLoad()viewWillAppear()viewWillDisappear()
The rest can also be deleted. Now, we only have to remove the call where the scene we previously deleted (located in art.scnassets) which is the following lines of code:
// Create a new scene
let scene = SCNScene(named: "art.scnassets/ship.scn")!

// Set the scene to the view
sceneView.scene = scene
After deleting this we removed all the unnecessary pieces of code and can start with our implementation.
Subscribing to user touches
The first thing we need to implement is capturing user touches on the screen of the device do is to get notified when the user touches the screen of the device. Fortunately, this is as easy as overriding the touchesBegan method from UIViewController. As described in the documentation it is run when touches by the user occur in the view or window. This makes it the perfect candidate for our use case:
override func touchesBegan(_ touches: Set<UITouch>, with event: UIEvent?) {
    // All future code will go inside this method if not stated otherwise
}
Getting the location of the touch
We have to go through a few steps here. The first one is to get the location of the touch in our current view. Having the Set<UITouch> as a parameter of the function we can try to get the first value and extract the location from it. It is not guaranteed that there are values inside so we will wrap that in a guard statement:
guard let location = touches.first?.location(in: sceneView) else {
    // In a production app we should provide feedback to the user here
    print("Couldn't find a touch")
    return
}
Find the place in the world with a raycast
Let’s get down to the barebones and do some fancy things. First, I want to quickly describe the concept of raycasting. It is a common concept in computer graphics where we basically fire a ray (originating from the location of the touch) through a scene (in our case the real world). Combining this with determining a hit test where the ray hits a surface in the real world we can detect where to place content.
Under the hood, this requires some serious matrix operations and advanced math concepts. What Apple is really great at is abstracting away these details from us and offering us a simple, easy-to-use API. There is no necessity (however it helps to have basic knowledge) to understand the underlying things happening.
With that being said let’s look at how to create and perform a raycast. We have the sceneView that is of type ARSCNView that offers us to create a raycastQuery. It takes the following three arguments:
from: thelocationwe got from our previous stepallowing: the targets we allow our raycast query to detect, which determines the specifity (regarding size and extent) of the planes that are consideredalignment: the alignment of the plane, which can be either.horizontal,.verticalor.any
With that out of the way here is the code that creates the query. Again, it is wrapped with a guard statement because it returns an Optional:
guard let query = sceneView.raycastQuery(from: location, allowing: .estimatedPlane, alignment: .horizontal) else {
    // In a production app we should provide feedback to the user here
    print("Couldn't create a query!")
    return
}
Now, we need to actually perform the raycast itself as we only created the query so far. Luckily, this is only another function call. This time we need to use the current session that is given to us by the sceneView again. It provides a raycast(ARRaycastQuery) method that returns an array of results. Once again we will only be interested in the first result so you know the drill by now:
guard let result = sceneView.session.raycast(query).first else {
    print("Couldn't match the raycast with a plane.")
    return
}
That’s it. We have the result we need for placing our content.
Creating an object to place into the world
The next step is to create the object we want to place in the world. In a more fancy app this might be a 3D model with sophisticated textures and cute animations. As we are down-to-earth people we will create a basic cube. Cubes are fun, right?
We will decouple this into a separate function call which you can happily replace with your own code and create wonderful pieces of art (let me know what you come up with). I don’t want to go into too much detail here but we’re basically creating a cube with a set of dimensions (in meters, sorry American friends). Then, we provide some SCNMaterial to it to give it some color and textures and then return it.
So we place this code outside of our touchesBegan function:
private func createCubeNode() -> SCNNode {
    // create the basic geometry of the box (sizes are in meters)
    let boxGeometry = SCNBox(width: 0.1, height: 0.1, length: 0.1, chamferRadius: 0)

    // give the box a material to make a little more realistic
    let material = SCNMaterial()
    material.diffuse.contents = UIColor.blue
    material.specular.contents = UIColor(white: 0.6, alpha: 1.0)

    // create the node and give it the materials
    let boxNode = SCNNode(geometry: boxGeometry)
    boxNode.geometry?.materials = [material]

    return boxNode
}
Now we can continue the flow in the touchesBegan method and call our previously created function:
let cube = createCubeNode()Position the object in the real world
We created an object but still need to place it at the position we determined earlier with the raycast. The result we got from the raycast is of type ARRaycastResult and it gives us what is called a worldTransform. It is not necessary to know what this really is but just know that it combines all the information which was gathered by ARKit about the position, rotation and scale of the position of the intersection of the raycast with the plane.
This worldTransform can now be used to create a matrix (of type SCNMatrix4) that we can then set to the transform (that we can think of as the position in the real world) of the cube:
cube.transform = SCNMatrix4(result.worldTransform)Now our cube is positioned at the correct place in the world. The last thing that is remaining is to add it to the rootNode of the scene from our given sceneView, so let’s do just that:
sceneView.scene.rootNode.addChildNode(cube)That’s it. We’re all done.
Putting it all together
Let’s have a look at our entire touchesBegan method and all the code required (except for the previously created createCubeNode() function):
override func touchesBegan(_ touches: Set<UITouch>, with event: UIEvent?) {
    guard let location = touches.first?.location(in: sceneView) else {
      print("Couldn't find location!")
      return
    }

    guard let query = sceneView.raycastQuery(from: location, allowing: .estimatedPlane, alignment: .horizontal) else {
      print("Couldn't create a query!")
      return
    }

    guard let result = sceneView.session.raycast(query).first else {
      print("Couldn't match the raycast with a plane.")
      return
    }

    let cube = createCubeNode()

    cube.transform = SCNMatrix4(result.worldTransform)

    sceneView.scene.rootNode.addChildNode(cube)
}
Considering what we can achieve here I think this is a pretty concise piece of code. Of course there is a lot more that we can do and that we should consider in a real-world application.
However, it is still really nice to be able to get started without having deep knowledge in math or computer graphics and still achieve decent results quickly.
Here is a little sample video of how the result looks like:
Thanks for following this tutorial. I hope you liked it and I’d love to get your feedback so feel free to contact me on Twitter or LinkedIn and show me what great ideas and apps you come up with.