TextField in SwiftUI
Learn how to use the TextField view in SwiftUI like a pro.
As mentioned in my last post most apps contain Text. If you want to read about how to use the Text View in SwiftUI (and some nice tips and tricks) you can take a look at my previous article about it.
In this post, I want to take a look at the TextField. It is quite surprising what capabilities the TextField view has when diving deep into it. But let’s start off directly with the basics.
(Note: Let me know if you enjoy that video setting more.)
Basics of TextField
The first thing we need to create with a TextField is a @State variable. The reason for that is that it needs to be mutable as it will hold the value the user is typing into the TextField.
We will user the example of a username to make things a little easier to follow. Fortunately creating a state variable is straight-forward and we can do that in a glance:
@State private var username: String = ""We’re on a great way and now can already create our TextField:
TextField("Enter user name", text: $username)The constructor takes a String (in our case: “Enter user name”) which represents a placeholder until the user will enter a value.
Once the user started typing the value will change to the username. We are using the $ sign to pass the state variable into the TextField as a Binding. What this does is it allows the TextField to change the value of username and all changes are reflected in our username variable.
The constructor of the TextField has two more optional arguments, which are both closures:
onEditingChangedonCommit
The first one is onEditingChanged which receives a Bool value as an input. You might have guessed that this Bool input is indicating whether the user is currently editing the TextField. It will be toggled when the user starts/ends editing the text. With that we can react to changes of that quickly.
Let’s have a look at how we can enhance our little example to incorporate this. We will add another @State variable which will change once the onEditingChange closure is called.
@State private var username: String = ""
@State private var isEditing = false

TextField("Enter user name", text: $username) { isEditing in
	self.isEditing = isEditing
}
We can then use a Text or any other indicators to show the current state of the editing or also perform any other action we like.
I was mentioning that there is a second optional argument the TextField takes. This one is called onCommit. This one is triggered when the user will hit the commits his/her changes. It does not get any arguments but gives us the ability to react to when the user is done entering. It could e.g. be used to check whether the entered value is valid or not.
This could look like this:
TextField("Enter user name", text: $username, onCommit: {
	validate(username)
})

func validate(_ name: String) {
	/* do smart validation things */
}
(The reason we need to write out the name of the trailing closure in this case is the existance of multiple trailing closures in the constructor. If that syntax is still a little challenging for you, don’t worry, there is a great article on this.)
Binding to non-String values
One very interesting fact is that the TextField does not require us to be binded to a String value. In fact we can bind to a lot of types. The only thing required in this case is to also pass a Formatter into the constructor of our TextField.
There are quite a few Formatters available (and you can find an entire list here). One of the most known is probably the DateFormatter but there are also other ones such as LengthFormatter, NumberFormatter, and even PersonNameComponentsFormatter (in fact, we can even create our own custom formatter).
As I think it is a pretty common use-case we’ll go with an example for the NumberFormatter but once we understand the concept we can use other formatters interchangeably.
First thing to do is to create two @State variables, one for the number and one for the formatter:
@State private var number = 0.0
@State private var formatter = NumberFormatter()
We can then create our TextField with the straight forward initializer:
TextField("Enter number", value: $number, formatter: formatter)(Note: When you enter a String into the TextField and hit commit the value for the number won’t change. Which is pretty cool if you want to validate that it really is a number)
(Caveat: The conversion is not happening as you type but only once the user commits the changes. This shouldn’t be huge problem in most cases but is worth noting.)
Of course we can still opt for the optional closures to add (remember, those were the onEditingChanged and the onCommit options). This gives us quite the power to give different inputs into our TextField which makes it a lot more powerful than it seems at first glance.
Text Field Styles
The first thing we can use to style our TextFields is (big surprise) custom styles. There is four options that all conform to the TextFieldStyle protocol (documentation).
We will have a look at how each of the options is rendered but here they are by name first:
DefaultTextStylePlainTextFieldStyleRoundedBorderTextFieldStyleSquareBorderTextFieldStyle(only available on macOS)
Let’s have a look at how the first 3 styles look on iOS:
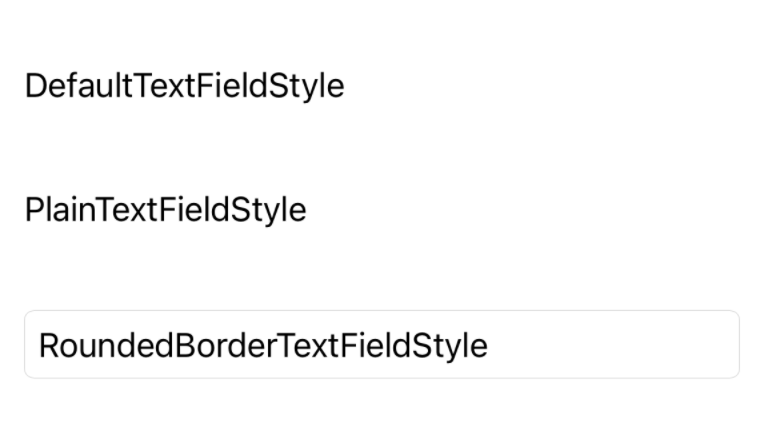
The first two look pretty much the same and only the RoundedBorderTextFieldStyle has a kind of different look as the name suggests.
Of course this is only where the styling fun starts. 🙂
Basic modifiers
There are some basic modifiers which are always possible to attach to SwiftUI views. I don’t want to cover all of them here but there are a few that are worth noting.
We can use the .font(Font?) modifier to change the appearance of the text. This can range from something small like .caption to larger entities, such as .largeTitle. There are quite a few and all can be seen here. It is also possible to manually set the font to an exact value via e.g. the .systemFont which is discussed further in my article about Text in SwiftUI.
Another interesting modifier is .textCase(Text.Case?). It can be set to either .lowercase or .uppercase. There are some apps which make heavy use of this in their typography but you should definitely know what you’re doing design-wise if you choose to manipulate your TextField.
It is also possible to set more advanced properties such as .minimumScaleFactor(CGFloat) and options for multiline text (however, in this case a TextEditor view might be a better fit). Again I have discussed these in my other post about Text.
For sizing and position there is also the .frame modifier where we can set a custom width and height for the TextField. This can be expressed in a rather short way:
TextField(/* initializer */)
	.frame(width: 200, height: 40
The .frame modifier however has some pretty advanced options which are not part of this post. For positioning we have the options to use the .position modifier and hardcode the position via x and y values (which will position the center of the view). Another possibility is to offset the view with the .offset modifier which also uses x and y parameters which are of type CGFloat.
Now, we can position a TextField like that:
TextField(/* initializer */)
	.frame(width: 200, height: 50)
	.position(x: 120, y: 100)
	.offset(x: 40, y: 200)
However, I want to emphasize that using these should pretty much only be done when we know what we’re doing. This interferes with the underlying layout system that SwiftUI is creating and the real position of our views might differ from the positions where they are shown. So let’s try to position our views using stacks and similar mechanisms and only come back to .position and .offset in desperate times.
There are some other modifiers in our toolbox as ambitious SwiftUI developers which we can also apply to our TextFields. We can add padding to our view with the .padding(CGFloat) modifier.
The text color can be changed with the .foregroundColor(Color) modifier. We’ll look at an example on the usage in a second. If we want to change the background of the TextField we can use the .background() modifier. Notice, that it does not only take colors, but you have a lot more options.
(Note: the .foregroundColor modifier only changes the color of the entered text, not the color of the hint that is shown initially.)
Let’s look at an example:
TextField(/* initializer */)
	.foregroundColor(.blue)
	.background(Color(.systemFill))
One last cute little modifier which can spice up our TextField is .border. We can give it a color and specify a width like e.g. .border(Color.blue, width: 4). This can also lead to nice effects.
Text Entry
There are multiple possible modifiers we can attach to a TextField to tailor it to our purpose. One of the most obvious ones is the .keyboardType(UIKeyboardType) modifier. It allows us to set the type of the keyboard popping up when the user starts interacting with the TextField.
There is plenty of options to choose from (see here for a complete list) and it will transform the keyboard depending on the use case of the TextField. We can e.g. set it to keyboardType(.emailAddress) in order for our user to have faster access to special characters like @ that are common in mail addresses. It is a simple thing to do but will have a huge impact on the usability of our product so we should take this really seriously.
There is other very common keyboard types such as .numberPad , .URL and (most importantly, which I didn’t know about) .twitter (we want to get our hashtags out quickly, right?) . By doing this little step we give our users a ton of value, so let’s all be good platform citizens and remember to do it.
The next modifier is the .disableAutocorrection(Bool?) one. As the name suggests it allows us to disable the system autocorrection where it might hinder the user. Sample use cases off the top of my head would be a username (which might not be regular words in some cases) or entering addresses.
Again, it can be really frustrating for the user when a username will be entered and altered through autocorrection (especially because this commonly happens early after starting to use our app) and needs to be re-entered. This might sound like nitpicking but this is a reason why users might not want to continue using our app. We can make their life easier with so little effort.
The next modifier belongs in the same realm, being .autocapitalization(UITextAutocapitalizationType). This short and sweet one allows us to disable whether text should be autocapitalized (who would have thought?). The UITextAutocapitalizationType enum has 4 cases:
.none(no automatic capitalization).words(first letter of each word will get capitalized).sentences(first letter of each sentence will get capitalized).allCharacters(useful for e.g. entering language codes such as US, DE, etc.)
I don’t think these require any more explanation. One thing I want to note is that if the aforementioned keyboardType is set to be of a numeric input type (such as .numberPad) the .autocapitalization modifier will simply be ignored.
The last modifier we look at is .textContentType(UITextContentType?). This will not have a direct visual effect on the TextField itself. However, this property is used to give semantic meaning to the input as also described in the documentation.
It allows the system to give meaningful suggestions to the user. We might e.g. need the user to enter an email address. We can do this by adding the .textContentType(.emailAddress) modifier to the TextField. Now, the system knows to suggest known email addresses when the user starts to enter values. This is again something to will improve usability and increase the amount of joy the user has while using our app.
There is a ton of options to choose from here, such as .name, .location, .postalCode, and even .oneTimeCode (full list here). It makes sense to go through the list whenever creating a TextField in order to leverage all the wonderful system capabilities Apple offers us.
(Note: this particular modifier is only available on iOS and tvOS, however there are macOS and watchOS equivalents with the exact same pattern, only that the content type is of type NSTextContentType and WKTextContentType respectively and has different values available to set.)
Bonus: What about passwords?
Now, there’s one more thing (see what I did there) I want to add. When the user needs to enter passwords or other kinds of sensitive data there is actually a better choice than TextField and it is called SecureField (find the documentation here).
It works just the same way as the regular TextField with a few limitations. We can only bind Strings to it (which makes sense as passwords are always Strings). There is also only one optional closure we can utilize which is the onCommit closure.
This is exact same one as for the TextField and it gives us a perfect place to validate the input the user has given us.
Let’s look at an example for it:
@State private var password: String = ""

var body: some View {
	SecureField("Enter password", text: $password) {
		validate(password)
	}
}

func validate(_ password: String) {
	/* smart code that will check for safe password */
}
(Note: here we can ommit the onCommit name of the trailing closure as this is the only one accetable in the constructor of the SecureField.)
It doesn’t look like a huge difference but it is definitely recommended to use this View when we require our users to enter passwords. It is both semantically correct and gives us a lot of the superpowers Apple provides us with when conforming to system standards.